


Welcome New Sisters! (click for current roster)
Merit Badge Awardees (click for latest awards)
My featured Merit Badge Awardee of the Week is … Linda Olivera!!!
Linda Olivera (#1919) has received a certificate of achievement in Stitching & Crafting for earning a Beginner, Intermediate, & Expert Level Quilting Merit Badge!
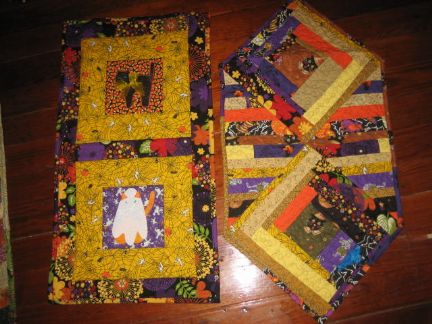
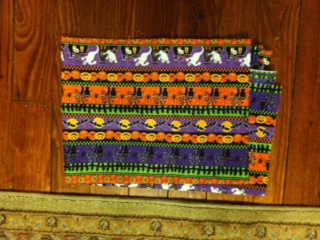
“I know how to quilt, so I made some scrappy table runners. They are smaller projects, use up fabric scraps, and don’t take as long as a quilt. Here are just 3 of the table runners I made. I love making table runners out of extra or ‘orphan’ quilt blocks and strips. All of my table runners have batting and backing and are bound. Backing fabrics sometimes, but not always, match the theme of the fabrics on the top.
As for teaching someone how to quilt, I have shown and demonstrated several quilting techniques at both of my local quilt guilds. With my larger guild, we have a skills night every September and I have demonstrated selvedge quilting there. At my smaller quilt group, I have also demonstrated various quilting techniques at our monthly meetings.
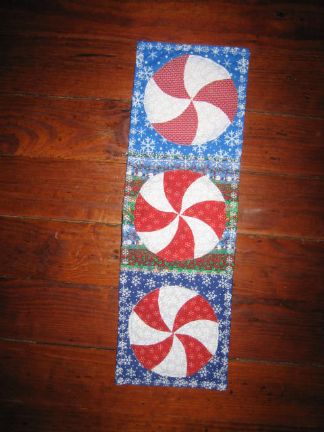
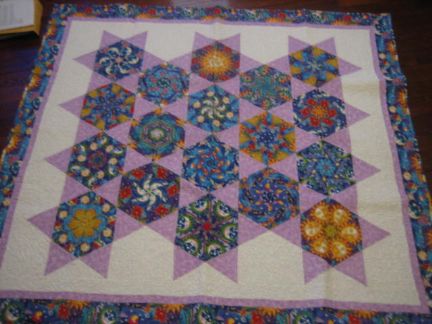
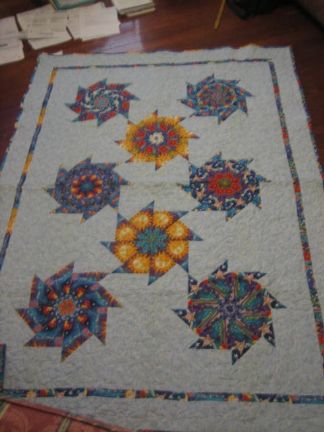
Below is a new quilting pattern/technique that I learned. I took a class from the designer of this technique and it is called ‘Those Amazing Stripes.’ The 2 table runners shown are just two of the projects I have made using this technique. I’ve made about 8 of these using different fabrics. The Reader’s Digest version is: Start with a striped fabric (see second picture) and figure out what the repeat pattern is. Carefully cut along the lines between the repeats into wide strips the width of the repeat. Cut those strips into squares with the width of the strip being the length of all four sides. Cut those squares into 4 triangles by making 2 cuts from corner to corner. Then, by arranging the similar triangles, you get what looks like a very complicated pattern. The same fabric gives you two or more different looks, depending on the placement of the triangles. The measuring and taping is the hardest part, then sewing them together adding backing and binding.
At a 3-day retreat, I taught this technique to 3 other quilters and they all left with their completed table runners. They loved this technique and have made several more table runners for gifts. We definitely quilted for more than 5 hours together.
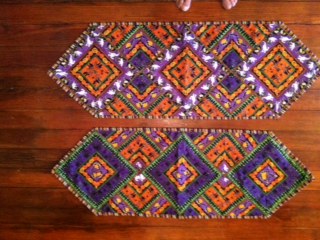
I learned another new technique called Stack-n-Whack. This requires a fairly busy fabric design with not too much background. You again find what the repeat length is and layer 6 or 8 pieces together, matching sharp points in the pattern of each layer with pins. They you cut into strips and then triangles. The size and shape of the triangle is based on the pattern you are using. Here are my 6-pointed and 8-pointed star quilts made from the same fabric using the Stack-n-Whack method. You can see how the fabric makes different designs using different-shaped triangles. I love the kaleidoscope look of the first quilt.
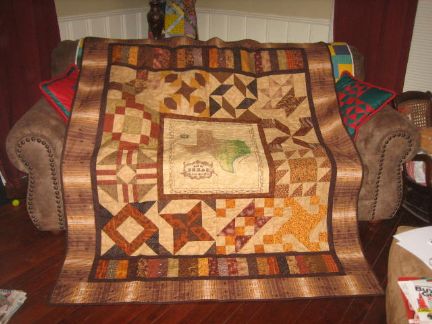
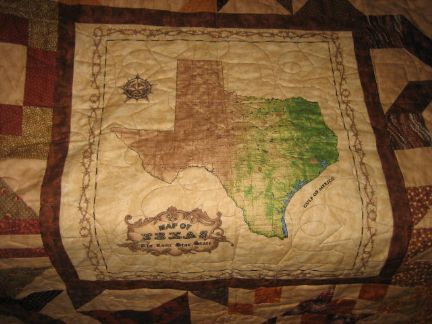
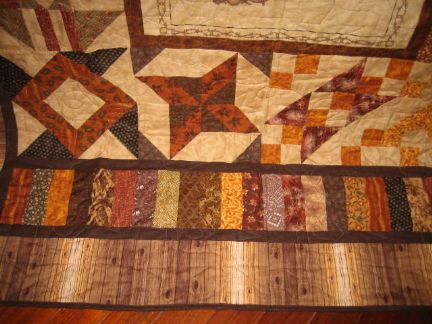
My Expert Level project is the quilt I made for my boyfriend for Christmas last year. I used the 12 Block-of-the-Month blocks chosen by my small quilt group. We meet each 3rd Monday at a local library. I had found a panel map that I wanted to incorporate into the quilt, so throughout the year, I used different brown tones for all the blocks. When assembling the quilt, I had to add a small border to make the 12” (finished) blocks fit evenly around the center focal map. Then I added an additional ‘piano key’ border on the top and bottom so the quilt was rectangular instead of square. Here are pictures of the entire quilt, the focal panel, and the piano keys border. I used fabric with a barn-wood design for the outer borders. By the way, he loved the quilt.
As for teaching 5 other people to quilt, this spring, I started a Block-of-the-Month thread in the Stitching Room on the MJF chatroom. August is the 4th month so far, and a different person has chosen the blocks every month. There are some people taking part who have never sewn before, and others who, like me, are experienced quilters. When someone sends me their pattern choices, and a link to them on QuiltersCache.com, I add helpful hints for the newby quilters and often post a link to the demonstration or instructions for the hint. If the blocks chosen are a bit too difficult for the beginners, I suggest that the person choosing them choose one other pattern that is a little easier for the beginners. I then post the more difficult block patterns so the experienced quilters can make them if they want. If the farmgirls make one block a month, they will have enough for a small quilt in a year; if they make 2 a month, it will be done more quickly. I will discuss settings for the blocks when they have enough for a quilt.”


Wow, Im impressed, you are a true artist with the needle and your designs are wondrous. I especially love the halloween ones!! Congrats on such great works of art!
Wow! Absolutely beautiful work! You earned your badges for sure. Thanks for sharing.
Congratulations Linda on such a fantastic account of all that you have been working on with your quilts!! You do beautiful work and I am impressed how you can take scraps and crest such pretty and useful runners and other smaller pieces. Your Halloweeen collection is darling!!