Hear Ye!

Welcome New Sisters! (click for current roster)

Merit Badge Awardees (click for latest awards)

My featured Merit Badge Awardee of the Week is … Christy Harrill!!!

Christy Harrill (MerryHeartSister, #1951) has received a certificate of achievement in Stitching & Crafting for earning an Expert Level Crochet Merit Badge!

“I learned ribbing, puff, picot and post stitches. I taught my niece, son and 4 homeschooled girls to crochet. I made a wrap for myself and a ruffled capelet for my daughter.

My daughter gets so many compliments. It is truly a unique piece.”

image(35)(1)

  1. Winnie Nielsen says:

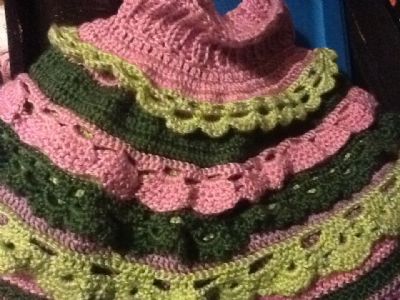
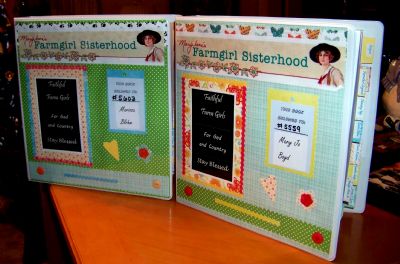
    Christy, this is a beautiful piece that you made! Wow, I love the colors and all the detail of the layers. Congratulations on your well deserved Expert level badge!!

  2. Kim Reeves says:

    Congratulations, Christy!! I love the details in this!! It’s so pretty!

Leave a Comment

Your email address will not be published. Required fields are marked *

My Fair Farmgirl Merit Badge, Expert Level

The adorable, always humorous MBA Jane is my way of honoring our Sisterhood Merit Badge program, now with 5,730 dues-paying members who have earned an amazing number of merit badges so far—8,037 total! Take it away, MBA Jane!!! MJ

Wondering who I am? I’m Merit Badge Awardee Jane (MBA Jane for short). In my former life   

For this week’s Cleaning Up/My Fair Farmgirl Expert Level Merit Badge, I decided to focus on one area of moi: my tresses. Those locks of love. My bonny curls. And if it’s first thing in the morning: the birds’ nest atop my noggin.

Being a girly girl, I confess to being tantalized, enraptured, besotted, and smitten with all things hair. Straighteners, curlers, potions, goos, goops, lotions, gels, shampoos, cream rinses, mousses, sprays, leave-ins, detanglers, creams, conditioners …  you name it, this farmgirl has tried it at one point or another. But could it be that all my smoothing and frizzing and combing and rinsing was actually damaging my hair instead of helping it?

I took a look at the ingredients on the back of my favorite shampoo and conditioner and momentarily thought I was attempting to read a different language. Gaelic perhaps? Elfish? Klingon? Baffled and saddened by the knowledge that my “natural” almond conditioner had less almonds and more synthetic ingredients than I could shake a stick at, I tried my hand at creating my own.

The result? Shiny, happy hair that smells delish, a less cluttered shower, and a happier Earth, if I do say so myself.

Brown Sugar Cookie Shampoo Scrub

  • 4 T organic brown sugar
  • 2 T coconut oil or shea butter
  • 1 T local honey

Use to stimulate and clean scalp: massage thoroughly and rinse well.

Apple Cider Rinse

  • organic apple cider vinegar
  • water

Keep in a bottle in your shower and use generously to add shine to your hair.

Marshmallow Detangler

  • 1 cup water
  • 1/4 marshmallow root
  • 1 T apple cider vinegar
  • 1 T oil (coconut, olive, or jojoba)
  • 5-10 drops essential oil, like lavender

Boil the water and steep the marshmallow root (as if you were making tea). Strain through a cheesecloth and add your other ingredients. Keep in spray bottle.

Herbal Hair Rinses
Ingredients (pick the ones that fit what you need):
Catnip: Promotes healthy hair growth.
Chamomile: Softens hair, soothes the scalp, lightens, and conditions (use it with honey to bring out natural highlights). Chamomile is also known to stimulate growth.
Horsetail: Helps brittle hair due to its high silica content.
Lavender: Stimulates hair growth.
Nettle: Conditions; improves texture; and helps with dandruff, irritated scalp, and dry scalp
Parsley: Enriches hair color and gives a nice luster.
Plantain: Great for dry, irritated scalp; dandruff; and seborrhea.
Peppermint: Stimulates the scalp.
Rosemary: Acts as a tonic and conditioner, one of the best herbs to use, gives luster and body, stimulates growth, helps with dandruff, and brings out dark highlights in the hair.
Sage: Very effective in restoring color to graying hair; excellent for weak, brittle hair.
Saw Palmetto: Good for thinning hair and hair loss.
Thyme: Good for oily hair and dandruff.
Witch Hazel: Cleanses hair.

Directions:
After you’ve decided which herb(s) will get the job done for your type of hair, follow the steps below:

  1. Place the herb(s) in a pitcher (glass is ideal).
  2. Pour boiling water over the herb(s), cover, and steep for 10-20 minutes.
  3. Strain the mixture and allow the liquid to cool.
  4. Pour over your head after your regular shampoo, condition, and detangling session. Do not rinse.


  1. Winnie Nielsen says:

    The past few months I switched to a shampoo bar with vinegar rinse. I love the results and my hair looks very shiny and healthy. I find that the full apple cider odor is too much for me so I mix apple cider with plain white vinegar in a 50/50 mix and that seems to be best for me. It did take me awhile to get over that issue of smelling like a pickle jar with every wash. At first I purchased a rinse that was infused with several herbs but I found it too overpowering in smell. So, plain and simple is better for me and it works!

  2. Oh my, I have waist length fine hair that tangles a lot. I did once use a shampoo bar while travelling in more remote countries but my hair always looked awful. I do try to be natural and now am using a good commercial shampoo without parabens or silicone and few ingredients but its surely not totally natural. Not sure I am ready to make my own shampoos but I do use nice apple cider vinegar or lemon rinses in summertime.

  3. Vanessa says:

    When I was a teen, I used rosemary rinse all the time on my brown hair. It smelled great!

Leave a Comment

Your email address will not be published. Required fields are marked *

My Fair Farmgirl Merit Badge, Intermediate Level

The adorable, always humorous MBA Jane is my way of honoring our Sisterhood Merit Badge program, now with 5,730 dues-paying members who have earned an amazing number of merit badges so far—8,037 total! Take it away, MBA Jane!!! MJ

Wondering who I am? I’m Merit Badge Awardee Jane (MBA Jane for short). In my former life    

For this week’s Cleaning Up/My Fair Farmgirl Intermediate Level Merit Badge, I went where none of us like to go.

Under my arms.

Yep, it was the pits under there.

Ha! Get it? The pits?

Hello? Is this thing on?

Well, anyway, I had been hearing lots of claims, stories, rumors, etc., about the dangers of deodorant.

I know, I know, what kind of a world do we live in where we even have to fear anti-perspirant? It’s a travesty.

But in all honesty, my farmgirl peeps, I was plugging my ears and not listening in a distinctly rebellious fashion.

La la la! I can’t hear youuuuuuuuuuu!

Like that. Only with less maturity (if possible).

You see, I’m a fan of smelling nice. I’m a fan of others smelling nice.

I am NOT a fan of body odor run amuck.

And even though the whispers were getting louder, I was still skeptical. Yeah sure, I thought, I’m all for hippy-dippy, granola loving, tree hugging, au naturale type living, but we gotta draw the line somewhere. And that line for me was the one you get from your stick of perfumed chemicals on your black t-shirt (hey, at least you know you remembered to apply it, right?)

But finally, I took my fingers out of my ears and decided to give it a go. What would be the worst that could happen? We were about to find out …

Sweet Orange and Mint Deodorant

1/3 c baking soda
1/3 c cornstarch or arrowroot powder
6 T coconut oil

Essential oil (I used sweet orange oil + tea tree oil, for their yummy smell + natural antifungal/antibacterial properties. You could also try lavender, rosemary, eucalyptus, almond … Mix it up!)

Combine your cornstarch and baking soda first. Mix with all your other ingredients and place into a small glass jar to store. Remember with your essential oils that the scent will lessen a bit when your mixture comes to room temperature, so don’t be afraid if it smells a little strong at first.

And now, the customizations:

  • Add more coconut oil (or a bit of shea butter, or the insides of a vitamin E capsule) if you need extra moisture/smoothing from your deodorant.
  • Decrease the ratio of baking soda/tea tree oil if you have sensitive skin.
  • Once you’ve applied your deodorant, pat a little cornstarch on top of your underarm to ‘set’ things—this also helps with long-term lessening of underarm pigmentation (who knew).

Well? The verdict? No one has pinched their nostrils shut with clothespins around me; I don’t have a white mess on my favorite shirt; I’ve lowered my risk of breast cancer and Alzheimer’s; and I think I may be in love. Plus, my underarms are baby soft, smooth, and irritation free.

Yay!

  1. Winnie Nielsen says:

    What a simple and cool idea. I love the simple ingredients and the ability to customize your scents. Is there a special ratio or amount of essential oil drops to the base formula that one starts off with?

  2. Wow and to think I just ” cheat ” and use ” Tom’s of Maine” all natural lavender deodorant! And I inherited a whole cache of my Aunt Mignon’ s fancy french perfumes (she had lived in France- her signature scent was Mitsouko, very hard to find now) and just douse myself in them! When I wear her Mitsouko I am instantly transported to happy childhood times spent with her.

  3. Terry Fest says:

    My daughter made her own deodorant a few weeks ago, as well as facial moisturizer. She told me the deodorant she made works beautifully. She has to give some to me. You did not make a comment on the actual “perspiration ordor” did it work well for that and just overall protection one looks for when sweating? oops glowing…? Thanks I will pass this on

  4. Barbara Criss says:

    I really love the idea of a natural deodorant. I cannot wait to make it and try it. I too have a fear of things that cause cancer and I want to use as many natural products as I can. Thanks for a great idea.

  5. Kim Reeves says:

    Oh my gosh!! This concept honestly SCARES THE DAYLIGHTS OUTTA ME!! I live in the heart of South Georgia! Our summers are scorchers and I sweat! I do not perspire! We are in the out doors all summer! (We farm and bale wheat straw and hay!) But,……..I’m gonna give it a whirl!! And I will surely get back to you on how well it works here!!
    I have honestly been wanting to try a different approach to the aluminum and other toxins that are getting into my body! (And my family’s!) your recipe is so simple I can’t lose! I need simple, too! We have started incorporating MAJOR coconut oil into our diets lately so i have a plenty to experiment with! Thank you for this post!

  6. Karlyne says:

    Be sure to use organic, non GMO cornstarch (surprisingly easy to find!). We don’t be needing GMOs in our pits!

  7. Cheryl Baker says:

    If you don’t want to make your own (which I’ve tried with some success), check out Primal Pit Paste. It works!

Leave a Comment

Your email address will not be published. Required fields are marked *

photo-of-the-day

farm_romance-5919

  1. Winnie Nielsen says:

    I love this little vignette. In my mom’s sewing machine drawers, there are some wooden thread spools that I have been keeping because they were from her days of sewing. Your idea here would make a sweet touch to my tiny sewing area. Thank-you!

  2. Karlyne says:

    Lovely! I never throw away anything that is a pretty container, no matter if it’s cracked, chipped or whatever!

  3. Ann says:

    I do so hope that you publish a book of your photos of the day. They are incredibly beautiful and unusual. I would love to own a book with these photos which I could thumb through on any given day for inspiration and perhaps frame a few. Thank you.

Leave a Comment

Your email address will not be published. Required fields are marked *

Hear Ye!

Welcome New Sisters! (click for current roster)

Merit Badge Awardees (click for latest awards)

My featured Merit Badge Awardee of the Week is … Mary Jo Boyd!!!

Mary Jo Boyd (Quiltsister413, #5559) has received a certificate of achievement in Stitching & Crafting for earning a Beginner Level Scrapbooking Merit Badge!

“For the beginner level, I needed to make a scrapbook commemorating a special event for a friend. I am NOT a scrapbooker, so this is really a challenge for me. I was really inspired by the article in the Sister Issue that Joy from Farmgirl Inspirations posted. I decided to make a farmgirl scrapbook for me and my daughter for Christmas.

So I not only made the two scrapbooks, I also started a farmgirl chapter (The Faithful Farm Girls) and now have 10 members! Hello! Who would have thought. But I did have a great time making the scrapbooks and Joy’s instructions helped so much! Thank you, Sister!!

Finished binders(1)

I gathered all my supplies and started cutting. I tried to use the fancy scrapbook scissors, but was having trouble keeping my lines straight. As a quilter, I am much more skilled in using a rotary cutter, so I switched out my regular blade for a scalloped blade and using my ruler and rotary cutter, cut all my pieces in record time! Farmgirl savvy!

I glued everything together and gathered all the inserts so I had places for every section. I can store my badge certificates, recipes, ideas, etc. A functional scrapbook … now that’s what I am talking about!

Our first farmgirl meeting was cancelled twice in January due to weather, but when we meet this month, I am going to demonstrate how to make the scrapbooks and even purchased the binders for each of the girls. Another member donated lots of scrapbooking supplies, so we should have a great time, and each of the girls will be on their way to earning their first badge as well!”

  1. Winnie Nielsen says:

    Mary Jo, this project is terrific! You did such a good job and your Farmgirl meeting is going to be such fun putting memories together. I especially love the idea of a functional scrapbook for keeping important Farmgirl paperwork. Great idea!! I wish I was going to be at your meeting.

Leave a Comment

Your email address will not be published. Required fields are marked *

Birds Merit Badge, Intermediate Level

The adorable, always humorous MBA Jane is my way of honoring our Sisterhood Merit Badge program, now with 5,730 dues-paying members who have earned an amazing number of merit badges so far—8,037 total! Take it away, MBA Jane!!! MJ

Wondering who I am? I’m Merit Badge Awardee Jane (MBA Jane for short). In my former life   

For this week’s Garden Gate/Birds Intermediate Level Merit Badge, I was inspired by a few different things:

Pinterest,

the stash of freebies I’ve collected from tag sales, curbs, and craigslist,

and our fine, feathered friends.

Now that the weather outside isn’t so frightful, I’ve been longing for more time out in my garden. And with that longing comes an intense need to decorate. I’m sure you’re familiar with the emotion; it’s usually what hits us after an afternoon of weeding or planting, or just lounging on your favorite porch swing. Pillows, you think. Or a DIY walkway. Or an arch over that spot of begonias. Or perhaps more twinkle lights? There’s always room for more twinkle lights, let’s be honest.

And while making your garden or lawn the cutest on the block, you can also make some winged creatures pretty happy (and well hydrated, to boot). After all, I don’t know exactly how much energy it takes to fly, but I’m guessing it’s more than your average stroll through the park. So … properly hydrated fowl and an adorable way to decorate? Two birds with one stone! Ha! I love it when I get a bit punny during merit badge time.

I lugged out my collection of things that needed some TLC.

MBA Jane’s DIY with TLC, that’s me.

Inspired by the creative muse that resided within me (and several Pinterest tutorials), I lined up my eclectic collection. Turns out, making bird baths or bird houses is limited only by your own imagination. You can use everything AND the kitchen sink! My kitchen sink was currently at work in the kitchen (I know, how mundane of me), but I did have other options, including:

• two teapots with broken and/or missing lids
• several teacups with chipped saucers
• cereal bowls from the dollar store
• a large silver ladle
• a few old license plates from other states
• a bundt pan
• a lighting sconce
• some candlesticks that weren’t a matched set
• a plant stand
• clay pots
• a broken, but sweet-looking decorative water fountain

Also, I had: Gorilla glue, hammers and nails, and several half-full containers of spray paint in a lovely shade of Robin’s Egg Blue (appropriate, no?)

My whimsy and imagination took hold. I like to think blue jays and sparrows and hummingbirds flew around, alighting on my shoulder as I worked, singing with me like a Disney princess, but I’m pretty sure it was just me. No matter—after they see what I’ve done with the place, they’ll be back and they’ll tell their friends. I’ll be the busiest bird hotel and spa in town. I considered hanging a Vacancy/No Vacancy sign up on my cutest mini house: a three-level Victorian, made out of my leftover roof shingles. I contented myself with washing up in my newest bath (made from the candlesticks and bundt pan) and straightened my second favorite bird house (a tipped over teapot hanging from the branches) before going inside my own home.

The birds in my neighborhood have it made in the shade.

I hope they like spending time there as much as I do.


  1. Winnie Nielsen says:

    Can you take some photos of these birdhouse originals? I am intrigued about the teapot one@! I hope they all get occupants this coming year.

  2. Rats, would have loved to see some of your bird houses! Please post a picture to inspire all of us. I make most of my birdhouses out of , you guessed it, birdhouse gourds. And 2 are built of wood to Audubon guideline/standards for the bluebirds. As for repurposing , I use broken flowered design plates as edging in beds. They make a pretty scalloped design.I have a devilish cat who is death to my vintage china, ( he “noses ” them off the table ) so I always have lots of broken dishes to work with.

  3. Karlyne says:

    I was just going to say that this article makes me want to see pictures!

Leave a Comment

Your email address will not be published. Required fields are marked *

photo-of-the-day

farm_romance-5543

  1. Winnie Nielsen says:

    This reminds me of the circe game, Button Button who’s got the Button?

  2. “Button button , who’s got the button?” Remember that sweet childhood game? I’ve always loved buttons but not like my friend Stella who is a collector and dealer of rare buttons. Going through her collections is amazing and glorious. Buttons “made” a woman’s outfit ( and men’s too in earlier times) and they proclaimed the wealth and taste of the wearer. The sheer quantity made from all materials throughout history is mind boggling. But my favorites in Stella’s collection are those hand painted china ones or the blown glass ones- little works of art. Ofcourse all I have are old pearl buttons but I love them just the same. Put fancy buttons on your clothes and enjoy a lovely small luxury.

  3. Deborah McKissic says:

    Such pretty buttons! I have an old blue glass mason jar, a large one, filled with old buttons, from my mom’s collection, my grandmothers..and, I use them in crafts. My little granddaughter, Miss Lyra, loves to spill them out and play with them, string them…take a few home..she carries a little purse that important things go in..and my buttons have found their way into it! When I was young, my mom kept her buttons, and still does, in an old “Luizianne” coffee tin…when I was young, maybe 5, I took a bright, red crayon and wrote on this can “bottoms of all kinds”..yes, I spelled buttons wrong..and it still bears those words and my mom and I still laugh at it when we reach for a “bottom” for a craft, ha, ha..

  4. Caroline Gasper says:

    Like your button display, I have been making button wreaths for Valentine’s day, posted them on Facebook and sent the picture to my sister, and you guessed it I spelled buttons, bottoms we had a good laugh. And I am old enough to know better. Just thought I would share.
    Caroline

Leave a Comment

Your email address will not be published. Required fields are marked *

Hear Ye!

Welcome New Sisters! (click for current roster)

Merit Badge Awardees (click for latest awards)

My featured Merit Badge Awardee of the Week is … Sherrilyn Askew!!!

Sherrilyn Askew (Sherri, #1350) has received a certificate of achievement in Stitching & Crafting for earning an Expert Level Sew Wonderful Merit Badge!

“I made a “BakeOver TakeOver” from the pattern in the Ideabook, and made 4 hot pads using repurposed fabric and embroidery patterns that came from there too.

The bakeover will be travelling to a Girl Scout sleepover tonight for the potluck dinner, and donated to the fearless Troop Leader to take home.

I looked at the purchased purse handles in the picture then looked at all the branches waiting to be chipped in my yard, and decided to make my own handles. I took an apple branch about and 1-1/2″ in diameter, cut it about 9″ long, split it in half with my hatchet, stripped the bark off, and sanded it smooth. I then put holes in either end for ribbons to go through, and rubbed both halves with a little olive oil, followed by beeswax. They turned out beautiful!”

Sherri 001

  1. Winnie Nielsen says:

    Sherrilyn, your casserole tote and potholders are wonderful! Your idea for the tote handles was pure genius and they turned out so pretty too. Congratulations on your Expert level achievement. You definitely showed Farmgirl ingenuity!!

  2. Wow Sherrilyn, that is taking it to a new level ! Most people would just buy the storebought handles but not enterprising you! Very nice!

  3. Jacqueline Ferri says:

    Very clever and so much nicer than storebought handles! Your handiwork is beautiful. Love the fabric for the bake over take over! Very vintage looking! It’s so nice to share great ideas and pictures! Jackie

Leave a Comment

Your email address will not be published. Required fields are marked *

photo-of-the-day

Flower4

  1. Winnie Nielsen says:

    One of the cool things about Lillies is that they come in lots of vibrant colors!

    By the way, I just got my copy of A Victorian Flower Dictionary from Amazon.com. Wow, what a lovely book! I am carefully reading through it before it ships to my older sister who loves flowers and worked as a florist for years making beautiful flowers for special occasions. She got the Downton Abby series for Christmas and I think this book is the perfect companion for her now. I am so thrilled that you brought it up on this blog. I can’t wait for her to get it as a surprise in the mail. The Queen Bee Farmgirl strikes again with her wonderful ideas!! Thanks Mary Jane!

Leave a Comment

Your email address will not be published. Required fields are marked *

My Fair Farmgirl Merit Badge

The adorable, always humorous MBA Jane is my way of honoring our Sisterhood Merit Badge program, now with 5,730 dues-paying members who have earned an amazing number of merit badges so far—8,037 total! Take it away, MBA Jane!!! MJ

Wondering who I am? I’m Merit Badge Awardee Jane (MBA Jane for short). In my former life  

For this week’s Cleaning Up/My Fair Farmgirl Beginning Level Merit Badge, I was wooed by the idea of au naturale beauty products.

I mean, come on. I’m a girl. A girly girl. One who loves a good facial, mani and pedi, and something flowery to spritz. But I’m also a farmgirl. One who loves to get her nails dirty, shops organic, and has even been known to go without shampooing. It’s a thing. A no ‘poo thing.

So what’s a girly farmgirl to do?

I’m so glad you asked.

Turns out the two aren’t mutually exclusive, after all. I can have my fuchsia-painted nails with a little farm dirt underneath, you might say. So this badge? This badge was the cat’s pajamas to earn.

Is it possible to earn more than one Beginning Level badge? No? Alas. Never mind, this is a badge that sticks and I think I’ll be making my own beauty products from here on out.

Here are a couple favorites for you beauties to try (synthetic-, paraban-, sulfate-, color-, cruelty-, preservative-, and chemical-free, naturally! Get it? Naturally? LOL!)

Chocolate Cream Face Mask

  • 1/3 cup cocoa (fair trade)
  • 1/4 cup honey (local)
  • 2 T heavy cream or sour cream (organic)
  • 3 T oatmeal powder*

Using a small bowl and spoon or spatula, mix all ingredients until well combined.

Gently massage into skin. Allow to stay (to get to know one another) for 15–20 minutes. Rinse. This mask doesn’t keep well, so it’s best to make it right before you want to use it, and invite a couple friends to share it that day.

*If you don’t have oatmeal powder, simply use Old Fashioned Oats and pulse in a food processor.

Fennel Toner

You’ll need:

  • 2 raw fennel bulbs (organic, if you can) puréed
  • 2 sprigs of fresh thyme (from your garden … or your neighbor’s garden)
  • Water (filtered)
  • Juice of half a lemon (once again—you guessed it—organic)

Bring the puréed fennel, thyme, and enough water to make it liquidy (1/4 to 1/2 cup) to a boil in a saucepan. Turn off the heat, add the lemon juice, and let it steep for 15 minutes. Strain out solids and transfer to a covered jar and let cool. Apply with a cotton ball under the eyes. Do not rinse.

Oil Cleansing Method for Your Pretty Face

  • a small jar or squeeze bottle
  • fill with 3/4 cup organic olive oil
  • top with 1/4 cup castor oil (found in the laxative section of your drug store) Use slightly more if you have oily skin. Castor oil is surprisingly drying!
  • a few drops of your favorite odiferous oil (like Sweet Almond, or Orange, or Almond)

Shake well. To cleanse, rub a dime-sized amount over face. Even over eyelids—it won’t sting! Massage in. Place a very hot washcloth over your face for a moment. This will steam and unclog your pores. Use a washcloth to gently wipe away excess oil. Removes make up like a dream and leaves you feeling fresh and pretty and soft! And don’t fret: I know it may seem weird to cleanse your face with oil, but once you try, you’ll never go back to those chemical-laced facial washes again. Even oily skin needs good oils, so don’t be afraid!


  1. Winnie Nielsen says:

    The skin on my face is a hybrid of oily and dry making it hard to find a product that doesn’t irritate it. This oil face cleaner is fascinating in both concept and simplicity. I am thinking I should try it and see how it works.

Leave a Comment

Your email address will not be published. Required fields are marked *